Creating a rock property model and assigning data
With the Create Model form (model > Rock Properties > Create Model), you can create a new model, assign data and define sub-sets of your grid to model individually. Each sub-set is called a Volume of Interest (VOI) in the workflow. After this step, you can follow the workflow on a per-VOI basis.
Volume of Interest (VOI) A sub-set of your 3D grid. It allows you to populate your 3D grid with rock properties by modeling each VOI separately.
Defining VOIs You define your VOIs based on the selections you make on the Create Model form, under 'Volume definition' and 'Nest within'.
Going through the workflow on a per-VOI basis It is recommended to take each VOI one by one through the workflow. You start with assigning a modeling method to one VOI. Only once you have completed defining the model parameters for one VOI, you should proceed with the next VOI. This lets you to focus on each VOI separately, analyze its data and fine-tune its modeling parameters. At the end of the workflow, you can run your model in parallel for all or only certain VOIs you selected.
Workflow steps Since each modeling method has its own specific set of modeling parameters, the workflow will automatically take you to the next relevant step. Some steps might be skipped depending on the method you selected or the data you have.
Rock property model The container which holds all the associated metadata: upscaled property, volume definition (i.e. VOIs), modeling method and modeling parameters per VOI, etc.
Rock grid property The resultant grid property, which is a combination of all modeled VOIs. Once you have run your model, it will be available in the JewelExplorer (3D Grids > Your 3D Grid > Properties > Rock Properties > Your Rock Grid Property). It is read-only and has the same name as the rock property model.
Toolbar on the Create Model form
You can duplicate, rename, or delete your existing rock property models via the toolbar on this form.

|
Duplicates the currently selected model in the drop-down list (i.e., the active model). |

|
Opens the Rename dialog, where a new name can be given to the active model. |

|
Deletes the active model. |
To create a new model, assign data and define VOIs
- On the Create Model form, select
 Create new from the drop-down list, and type a name for the model.
 - Select the property type you want to create from the Type drop-down menu.
- Select the Grid from the drop-down menu. (If you already have an existing Rock Property Model and you want to assign another grid, see Assigning another grid to an existing facies-, rock- or function-based property model.)
- Select the Upscaled property that you want to use as input for modeling. The property needs to be stored in the 3D Grid> 'Upscaled Properties' folder in the JewelExplorer to be available for selection. If you have not created this property yet, create it with the model > Rock Properties > Tools > Upscale Well Log tool. You can also select an upscaled, function-based property created with the Property Tool.
- Select a property from the Volume definition drop-down list, to define sub-sets of your grid. Each sub-set is called a 'Volume of Interest' (VOI) in the workflow. Each VOI can get it's own unique set of modeling parameters (e.g. modeling method, data transformation, variogram, etc.) as you progress through the workflow.
- (Optional) When you are creating your rock property model, you can further subdivide your volume definition into classes. You can do this by selecting an existing discrete property under Nest classes from. This enables you to specify different modeling methods/specifications for your modeled rock property not only per selected volume definition, but also per discrete property class.
- Once the Nest classes from option is selected, in the adjacent table on the form, the Nest checkbox will be automatically checked for all the Volume definitions. Uncheck the volumes for which you do not want to apply nesting.
- Click Apply to create the model and keep the form open, or click OK to create the model and proceed to the Assign Method form.
When the property symbol of an upscaled property has a cogwheel, it means the property is associated with a 'well log upscaling case' on the Upscale Well Log form. This means that if you select the property on the Upscale Well Log form, all upscaling settings are retained. click to enlarge
For example, the spatial distribution of porosity might differ per facies class. By nesting facies classes from your selection into your Volume definition, separate VOI’s per facies class will be generated, which can be modeled accordingly.
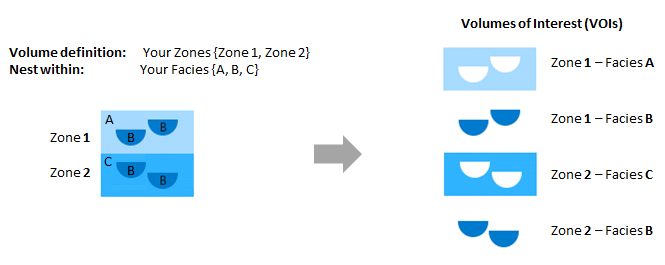
You can define your Volumes of Interest (VOIs) on the Create Model form, using the 'Volume definition' and 'Nest classes from' options. click to enlarge
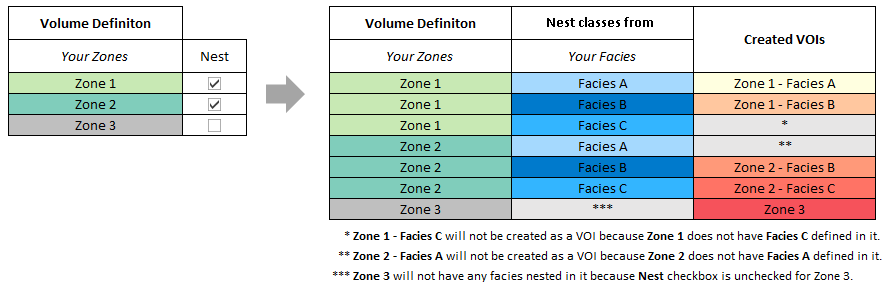
You can use the 'Nest' checkbox in the adjacent table on the form, to select volume definitions for which you want to apply nesting. click to enlarge